Anatomy of a Redi Cube
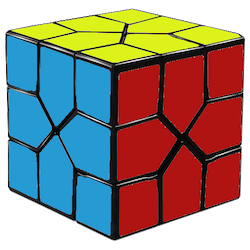
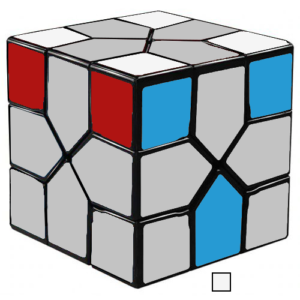
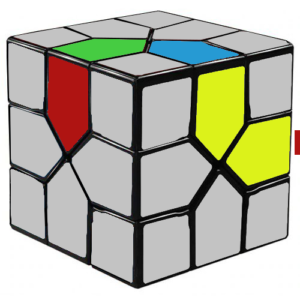
A Redi cube looks like this [1]:
It has 8 corners, 12 edges, and 0 center pieces. The corners are fixed in place, but they can rotate either 120° or 240° (one or two rotations). Three rotations move the corner back to its original orientation. Edges can be permuted freely around the cube by rotating neighboring corners, and their orientation is dependent on their position, so orientation can generally be ignored during the solve.
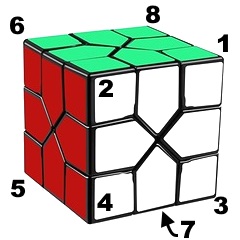
This puzzle isn’t too terribly common (sadly), so there doesn’t exist a standard scheme for labeling the corners. We’ll use the one proposed in the link above, where 3 faces are visible at a time and corner 2 is nearest the solver.
NOTE: The corner numbers are based on relative position, not absolute position. Any of the 8 corners can be in position 2, for example. If the cube in the picture above were to be rotated 90° clockwise, the Green/White/Orange corner would be in position 2, rather than the Green/Red/White corner. We’ll often use rotations of the entire cube to simplify the explanation of the solution below.
To denote a clockwise turn, we’ll list the corner number without any modification (e.g. 1). To denote a counterclockwise turn, we’ll append a prime symbol ‘, (e.g. 1′). The algorithm 2 1 2′ 1′ would be interpreted as: “turn the corner nearest you once clockwise, then turn the corner on the top-right side once clockwise, then turn the corner nearest you once counterclockwise, then turn the corner on the top-right side counterclockwise”.
Hopefully you can understand why we want to simplify the notation…
Anyway, moving on!
General Solution
As with most twisty puzzles, there are potentially many methods for solving a Redi Cube. We’ll present a simple method here that relies more on intuition than on memorization, so it should be applicable to a wide audience. Here’s the general outline of what we need to do:
- Solve 4 corners on the first layer.
- Solve first layer.
- Solve remaining 4 corners.
- Solve 4 edges in middle layer.
- Permute edges in final layer.
These steps are very similar to those used in the Beginner’s method used for solving a traditional 3×3, if you’re familiar with that approach.
Step 1: Solve 4 corners on the first layer
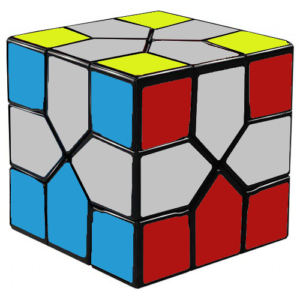
Starting from a scrambled Redi Cube, the first step is to solve 4 corners on the same face, independent of any of the 12 edges. We’ll start with the white face in our examples.
Unlike a traditional 3×3, identifying which face is supposed to be white may not be immediately obvious. The trick is to locate the 4 corners that all have 1 white side. Since corners cannot be moved in a Redi Cube, those 4 corners that share a white face can be solved simply by rotating them either 0, 1, or 2 times (either clockwise or counterclockwise) until they are all aligned.
When finished with this step, your cube should look like this:
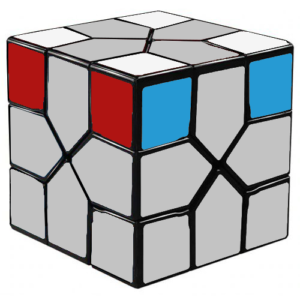
In the worst case, this step should require no more than 4 corner rotations, so no memorization is necessary.
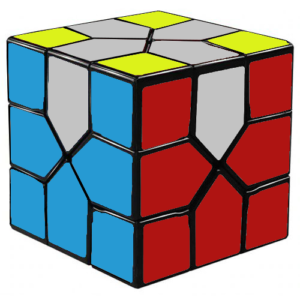
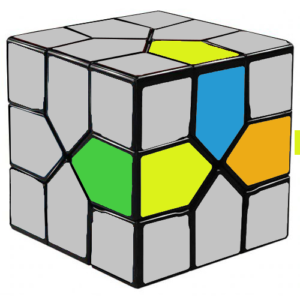
Step 2: Solve first layer
The goal of this step is to fill in each of the 4 edge pieces that sits on the white face of the cube. When completed, your cube will look like this:
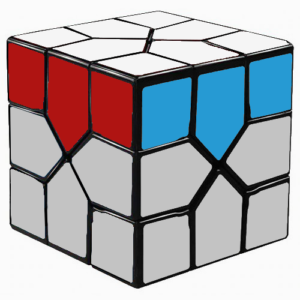
Like step 1, this step is also intuitive. No memorization is necessary, but we’ll provide some advice to help out.
You’ll want to identify each of the 4 edges that have white on one side. We’ll slot each into its final position based on these guidelines. (Try to get all of the easy ones done first. You may find that the hard cases will sometimes take care of themselves during your solve, which saves you an extra step.)
Easy Case – Edge is in the middle or bottom layer
Notice that if the white face is facing up, you can move any of the 4 bottom corners as much as you’d like without disrupting what you’ve already done. This is very helpful for moving edges around the cube to where you want them.
In particular, notice that a rotation of one of the bottom corners moves pieces from the middle layer into the bottom layer, and from the bottom layer into the middle layer. Any edge in the middle or bottom layers can be moved to any other position in the middle or bottom layers just by rotating those bottom corners.
- If an edge is in the middle layer, rotate one of the bottom corners attached to it until it is in the bottom layer. This requires at most 1 rotation.
- If an edge is in the bottom layer and not placed correctly, simply rotate corner 4 clockwise, then rotate the entire cube 90° counterclockwise and repeat until the edge is positioned where you want it.
Our goal is going to be to place one of the white edges directly below its corresponding slot in the top layer using these strategies.
From there, we can slot the edge into the correct position using either of these algorithms:
1′ 3 1 OR 2 4′ 2′
The choice of which algorithm to use is completely up to you, as the effect is the same. The first shifts the edge into place using the right adjacent corner and the second accomplishes the same using the left adjacent corner. Rotating a corner and then immediately rotating it again in the opposite direction means that the corner stays solved before and after the algorithm, ensuring that we haven’t undone all of the hard work we did in step 1.
Harder Case – Edge is in the top layer already, but in the wrong slot
If you find yourself in this situation, you’ll need to do some work to move the edge piece out of the top layer before you can apply the advice for the easy case (see above).
Thankfully, slotting a piece out of the top layer is just as easy as slotting a piece into the top layer. You can even use the same algorithms as before! Just make sure to rotate the cube so that the edge you want to remove from the top layer is between corners 1 and 2 before you start.
Once all 4 top edges have been placed correctly, flip the cube upside down and move on to step 3.
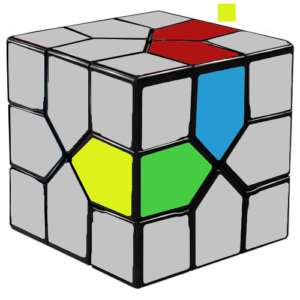
Step 3: Solve remaining 4 corners
The goal of this step is to orient each of the 4 remaining corner pieces. The approach matches step 1 exactly. Rotate each corner piece until the yellow face is on top for all 4. Each corner need only be rotated once (either clockwise or counterclockwise), so this step should take no more than 4 rotations in total.
Your cube should now look like this:
WARNING: It is easy to forget this step and move straight to step 4. If you do, you’ll have to come back to step 3 and start again, so do be careful.
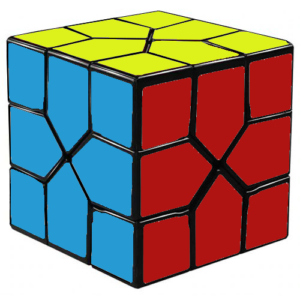
Step 4: Solve 4 edges in middle layer
At this point, there should be exactly 4 edges in the middle and top layers that do not have a yellow side. These 4 edges need to be placed into their correct slots in the middle layer, leaving a cube that looks like this:
Commutators
Our approach will be to generalize the solution for step 2 using commutators. A commutator is an algorithm of the form A B A’ B’ that is typically used to cycle a few pieces in a cube without disrupting any of the other pieces. In our case, our commutators will cycle 3 edge pieces without disrupting any of the corners or other edge pieces.
For example, the algorithm 2′ 1′ 2 1 is a commutator that cycles the edge pieces in these 3 locations. We call this an LL commutator because both corners 2 and 1 are twisted to the left when executing it.
The algorithm 2 1 2′ 1′ is another commutator, one that cycles the edge pieces in 3 different locations. Similarly, we call this an RR commutator, since both corners 2 and 1 are twisted to the right.
These algorithms will cycle each of their 3 edge pieces clockwise. To move a piece counterclockwise in the cycle, we can either: 1) apply the commutator twice or 2) apply it in reverse (e.g. use 1 2 1′ 2′ instead of 2′ 1′ 2 1).
Since these commutators cycle 3 edge pieces, applying one of them 3 times in a row will return the cube to its original position.
Middle Layer Strategy
Notice that both the LL and RR commutators cycle two adjacent edges in the top layer and one edge in the middle layer. Since we don’t care (right now) about the edges in the top layer, we can use the top layer as scratch space to help us put the middle edge we’re working on into its correct slot.
For each of the middle edge pieces, we’ll apply the following strategy:
Easy Case: Edge is in the top layer
Suppose we’re trying to fill the slot between corners 2 and 4. If the matching edge is in the top layer, one of of the commutators given above (or their reverses) can be applied to correctly position the piece.
- If the edge is between corners 1 and 8, we can use an LL commutator.
- If the edge is between corners 1 and 2, we can either use an LL commutator twice OR apply the LL commutator in reverse.
- If the edge is between corners 2 and 6, rotate the cube 90° counterclockwise, then apply the RR commutator.
- If the edge is between corners 6 and 8, rotate the cube 90° counterclockwise, then either apply the RR commutator twice OR apply the RR commutator in reverse.
Harder Case: Edge is in the middle layer
As with step 2, it is possible for the edge we care about to be placed in the wrong slot in the middle layer. When this happens, that edge must first be moved out of the middle layer into the top layer, and then the advice given above for the easy case will apply.
Mechanically, one of the commutators we’ve defined already just needs to be applied to cycle the middle edge into one of the top edges. For example, if the cube is positioned such that the incorrect edge lies between corners 2 and 4, the LL commutator will move it into the top layer.
One could also position the edge so that it lies between corners 1 and 3 so the RR commutator could be applied. There are, in fact, several options for relocating the middle edge. You can use whichever technique most appeals to you.
Step 5: Permute edges in final layer
At this step, either 0, 3 or 4 edges in the last layer will be incorrectly positioned and/or oriented. Our strategy will be to use another commutator to cycle 3 of those pieces in the top layer. The LR commutator has the following algorithm: 2′ 1 2 1′. It cycles these 3 edges:
NOTE: The cube is turned on its side when executing this algorithm, as we want to cycle the yellow edges instead of the red/blue/orange/green ones. The yellow face will have corners 1, 2, 3, and 4.
NOTE 2: You could use the algorithm 6′ 8 6 8′ instead (without rotating the cube), but I find that the first approach is easier to think about and remember since it parallels the LL and RR commutators given earlier. As always, use what works for you, though.
This algorithm cycles 3 edges in a clockwise fashion. As with the LL and RR commutators, the edges can be cycled counterclockwise by either executing the commutator twice or executing it in reverse (1′ 2 1 2′).
The application of this commutator depends on whether 3 or 4 edges need to be cycled.
Easy Case: 1 edge placed correctly, 3 edges need to be cycled
In this situation, the cube just needs to be oriented such that the LR commutator (or its reverse) can be applied directly.
Harder Case: 4 edges placed incorrectly
If all four edges are placed incorrectly, cycle any 3 of them using the LR commutator. The goal is to move one of the edges into its correct position, reducing the problem to the easy case.
Congratulations! You’ve solved the Redi Cube!
Final Thoughts
This method for solving the Redi cube requires very little (or no) memorization. The first 3 steps are effectively done intuitively, and the last 2 steps only require a few very simple algorithms that could be reinvented if necessary.
If you look back, you may observe that the suggestions used for step 2 are actually to use commutators, but without the last step. We just didn’t use that language. The last step of the commutator can be skipped since we didn’t care about disrupting the orientation of the corners on the bottom layer, but the process is exactly the same as that used for steps 4 and 5. Cool, huh?
The use of commutators is a very common method for solving twisty puzzles. They form the basic building blocks of many solving techniques and require very little effort to learn, making them extremely powerful in practice, especially for new puzzles.
Commutators are also the basis for more advanced solutions to this puzzle. For example, one could first solve all of the corners using simple rotations before applying the LL, RR, and LR commutators to shuffle around edges until the puzzle is completed. This approach is slightly less straightforward, but it may have the potential to be faster in practice. Give it a try!
Remarkable! Its truly amazing paragraph, I have got much clear idea on the topic of from this post.
Awesome post! Keep up the great work! 🙂
I think you should make a video about this on YouTube…